Upgrade a running network
Unlike many blockchains, the Substrate development framework supports forkless upgrades to the runtime that is the core of the blockchain.
Most blockchain projects require a hard fork of the code base to support ongoing development of new features or enhancements to existing features.
With Substrate, you can deploy enhanced runtime capabilities—including breaking changes—without a hard fork.
Because the definition of the runtime is itself an element in the state of a Substrate-based chain, network participants can update this value by calling the set_code function in a transaction.
Because updates to the runtime state are validated using the blockchain's consensus mechanisms and cryptographic guarantees, network participants can use the blockchain itself to distribute updated or extended runtime logic without needing to fork the chain or release a new blockchain client.
This tutorial illustrates how to upgrade the runtime without creating a fork of the code base or stopping the progress of the chain. In this tutorial, you'll make the following changes to a Substrate runtime on a running network node:
- Increase the
spec_versionof the runtime. - Add the Utility pallet to the runtime.
- Increase the minimum balance for network accounts.
Before you begin
Before you begin, verify the following:
- You have configured your environment for Substrate development by installing Rust and the Rust toolchain.
- You have completed Build a local blockchain and have the Substrate node template installed locally.
- You have reviewed Add a pallet to the runtime for an introduction to adding a new pallet to the runtime.
Tutorial objectives
By completing this tutorial, you will accomplish the following objectives:
- Use the Sudo pallet to simulate governance for a chain upgrade.
- Upgrade the runtime for a running node to include a new pallet.
- Submit a transaction to upload the modified runtime onto a running node.
Authorize an upgrade with Sudo
Typically, runtime upgrades are managed through governance with community members voting to approve or reject upgrade proposals.
In place of governance, this tutorial uses the Sudo pallet and the Root origin to identify the runtime administrator with permission to upgrade the runtime.
Only this root-level administrator can update the runtime by calling the set_code function.
The Sudo pallet enables you to invoke the set_code function using the Root origin by specifying the account that has root-level administrative permissions.
By default, the chain specification file for the node template specifies that the alice development account is the owner of the Sudo administrative account.
Therefore, this tutorial uses the alice account to perform runtime upgrades.
Resource accounting for runtime upgrades
Function calls that are dispatched to the Substrate runtime are always associated with a weight to account for resource usage.
The FRAME System module sets boundaries on the block length and block weight that these transactions can use.
However, the set_code function is intentionally designed to consume the maximum weight that can fit in a block.
Forcing a runtime upgrade to consume an entire block prevents transactions in the same block from executing on different versions of a runtime.
The weight annotation for the set_code function also specifies that the function is in the Operational class because it provides network capabilities.
Function calls that are identified as operational:
- Can consume the entire weight limit of a block.
- Are given maximum priority.
- Are exempt from paying transaction fees.
Managing resource accounting
In this tutorial, the sudo_unchecked_weight function is used to invoke the set_code function for the runtime upgrade.
The sudo_unchecked_weight function is the same as the sudo function except that it supports an additional parameter to specify the weight to use for the call.
This parameter enables you to work around resource accounting safeguards to specify a weight of zero for the call that dispatches the set_code function.
This setting allows for a block to take an indefinite time to compute to ensure that the runtime upgrade does not fail, no matter how complex the operation is.
It can take all the time it needs to succeed or fail.
Add the Utility pallet to the runtime
By default, the node template doesn't include the Utility pallet in its runtime. To illustrate a runtime upgrade, you can add the Utility pallet to a running node.
Start the local node
This tutorial illustrates how to update a running node, so the first step is to start the local node with the current runtime.
To start the node with the current runtime:
- Open a terminal shell on your computer.
- Change to the root directory where you compiled the Substrate node template.
-
Start the previously-compiled local node in development mode by running the following command:
cargo run --release -- --devLeave this node running. You can edit and re-compile to upgrade the runtime without stopping or restarting the running node.
- Open the Polkadot/Substrate Portal in a browser and connect to the local node.
-
Click the left-most dropdown menu to select the network.
![Select network]()
-
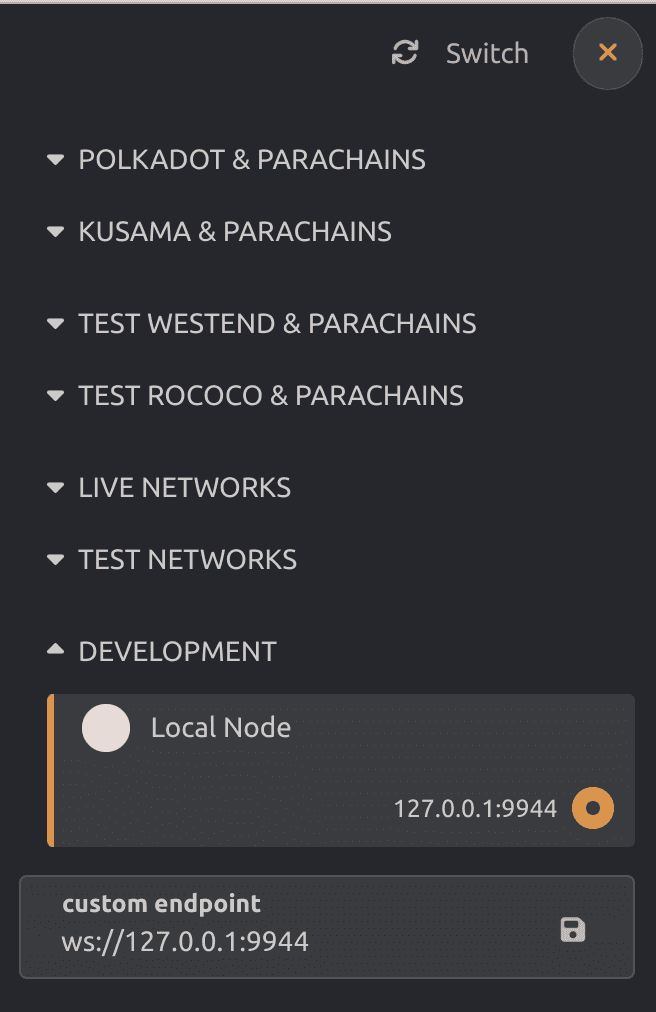
Under Development, select Local Node, then click Switch.
![Select network]()
In the upper left, notice the node template version is the default version 100.
![Node template version]()
Add the Utility pallet to the runtime dependencies
To update the dependencies for the runtime to include the Utility pallet:
- Open a second terminal shell window or tab.
- Change to the root directory where you compiled the Substrate node template.
- Open the
runtime/Cargo.tomlfile in a text editor. -
Locate the
[dependencies]section.For example:
[dependencies] codec = { package = "parity-scale-codec", version = "3.6.1", default-features = false, features = ["derive"] } scale-info = { version = "2.10.0", default-features = false, features = ["derive"] } pallet-aura = { git = "https://github.com/paritytech/polkadot-sdk.git", tag = "polkadot-v1.9.0", default-features = false } -
Add the Utility pallet as a dependency.
For example, add a single line with the following fields:
pallet-utility = { git = "https://github.com/paritytech/polkadot-sdk.git", tag = "polkadot-v1.9.0", default-features = false } -
Locate the
[features]section and the list of the default features for the standard binary.For example:
[features] default = ["std"] std = [ "frame-try-runtime?/std", "frame-system-benchmarking?/std", "frame-benchmarking?/std", "codec/std", "scale-info/std", -
Add the Utility pallet to the list.
"pallet-utility/std", - Save your changes and close the
Cargo.tomlfile.
Add the Utility pallet configuration
To add the Utility types and configuration trait:
- Open the
runtime/src/lib.rsfile in a text editor. -
Add the implementation for the Config trait for the Utility pallet.
impl pallet_utility::Config for Runtime { type RuntimeEvent = RuntimeEvent; type RuntimeCall = RuntimeCall; type PalletsOrigin = OriginCaller; type WeightInfo = pallet_utility::weights::SubstrateWeight<Runtime>; } -
Locate the
construct_runtime!macro.#[frame_support::runtime] mod runtime { #[runtime::runtime] #[runtime::derive( RuntimeCall, RuntimeEvent, RuntimeError, RuntimeOrigin, RuntimeFreezeReason, RuntimeHoldReason, RuntimeSlashReason, RuntimeLockId, RuntimeTask )] pub struct Runtime; #[runtime::pallet_index(0)] pub type System = frame_system; -
Add the Utility pallet inside the
construct_runtime!macro.#[runtime::pallet_index(x)] //*** Change Pallet Index ***// pub type Utility = pallet_utility; -
Locate the
runtime_versionmacro.#[sp_version::runtime_version] pub const VERSION: RuntimeVersion = RuntimeVersion { spec_name: create_runtime_str!("node-template"), impl_name: create_runtime_str!("node-template"), authoring_version: 1, spec_version: 100, impl_version: 1, apis: RUNTIME_API_VERSIONS, transaction_version: 1, state_version: 1, }; -
Update the value for the EXISTENTIAL_DEPOSIT for the Balances pallet.
pub const EXISTENTIAL_DEPOSIT: u128 = 1000; // Update this value.This change increases the minimum balance an account is required to have on deposit to be viewed as a valid active account. This change doesn't remove any accounts with balances between 500 and 1000. Removing accounts would require a storage migration. For information about upgrading data storage, see storage migration
-
Increment the
spec_versionto specify the new runtime version.spec_version: 101, // Change the spec_version from 100 to 101The fields for the
runtime_versionspecify the following information:spec_namespecifies the name of the runtime.impl_namespecifies the name of the outer node client.authoring_versionspecifies the version for block authors.spec_versionspecifies the version of the runtime.impl_versionspecifies the version of the outer node client.apisspecifies the list of supported APIs.transaction_versionspecifies the version of the dispatchable function interface.state_versionspecifies the version of the key-value trie data structure that the runtime uses.
To upgrade the runtime, you must increase the
spec_version. For more information, see the FRAME System module and thecan_set_codemethod. - Save your changes and close the
runtime/src/lib.rsfile.
Recompile and connect to the local node
- Verify that the local node continues to run in the first terminal.
-
In the second terminal where you updated the runtime
Cargo.tomlandlib.rsfiles, recompile the runtime by running the following commandcargo build --release --package node-template-runtimeThe
--releasecommand-line option requires a longer compile time. However, it generates a smaller build artifact that is better suited for submitting to the blockchain network. Storage optimization is critical for any blockchain. With this command, the build artifacts are output to thetarget/releasedirectory. The WebAssembly build artifacts are in thetarget/release/wbuild/node-template-runtimedirectory. For example, you should see the following WebAssembly artifacts:node_template_runtime.compact.compressed.wasm node_template_runtime.compact.wasm node_template_runtime.wasm
Execute a runtime upgrade
You now have a WebAssembly artifact that describes the modified runtime logic. However, the running node isn't using the upgraded runtime yet. To complete the upgrade, you need to submit a transaction that updates the node to use the upgraded runtime.
To update the network with the upgraded runtime:
- Open the Polkadot/Substrate Portal in a browser and connect to the local node.
- Click Developer and select Extrinsics to submit a transaction for the runtime to use the new build artifact.
- Select the administrative Alice account.
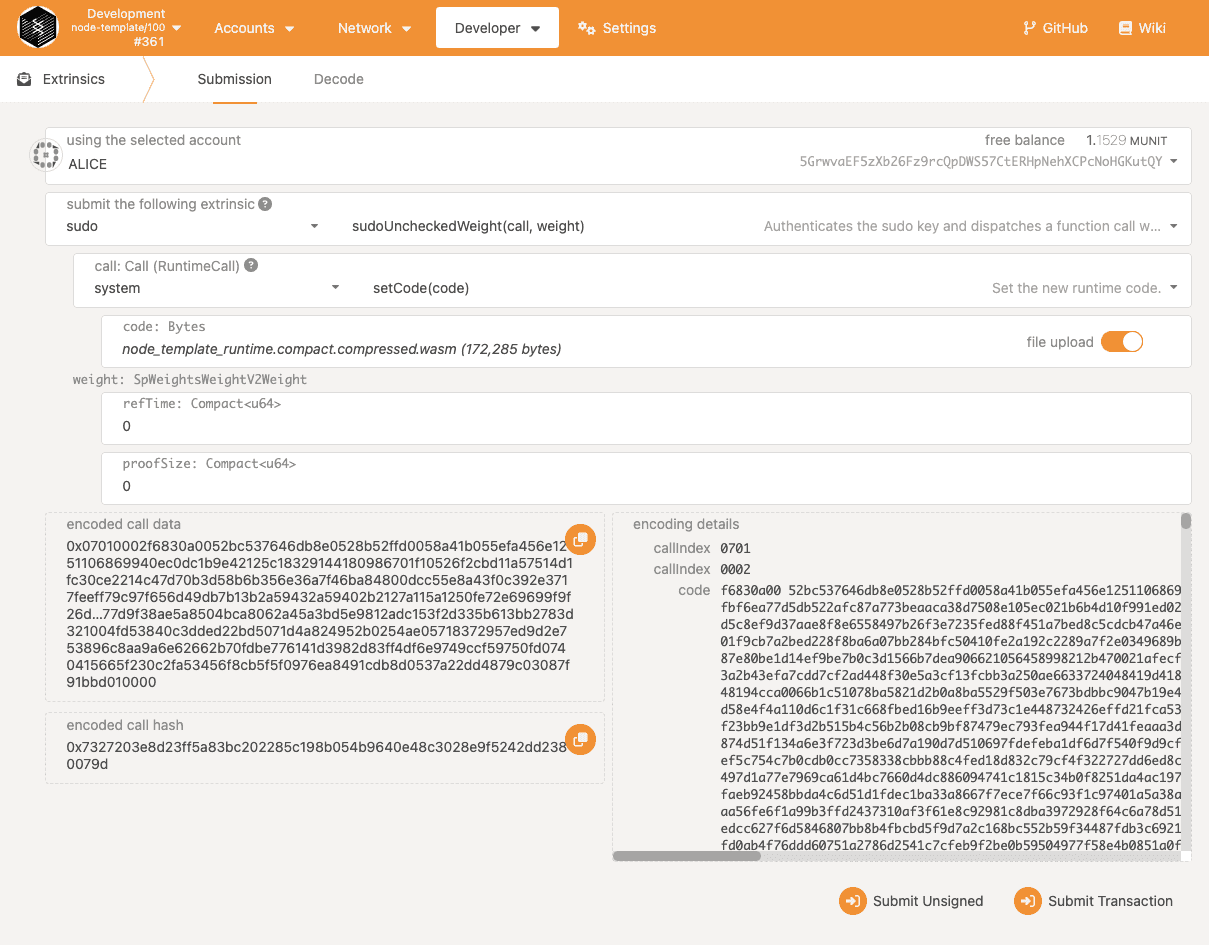
- Select the sudo pallet and the sudoUncheckedWeight(call, weight) function.
- Select system and setCode(code) as the call to make using the Alice account.
-
Click file upload, then select or drag and drop the compact and compressed WebAssembly file—
node_template_runtime.compact.compressed.wasm—that you generated for the updated runtime.For example, navigate to the
target/release/wbuild/node-template-runtimedirectory and selectnode_template_runtime.compact.compressed.wasmas the file to upload. -
Leave both of the weight parameters set to the default value of
0.![Runtime upgrade settings]()
- Click Submit Transaction.
- Review the authorization, then click Sign and Submit.
-
Click Network and select Explorer to see that there has been a successful
sudo.Sudidevent.![Successful sudo event]()
After the transaction is included in a block, the node template version number indicates that the runtime version is now
101. For example:![Updated runtime version is 101]()
If your local node is producing blocks in the terminal that match what is displayed in the browser, you have completed a successful runtime upgrade.
- Click Developer and select Extrinsics. Click on submit the following extrinsic and scroll to the bottom of the list. You will see utility as an option.
-
Verify the constant value by querying the chain state in the Polkadot/Substrate Portal.
- Click Developer and select Chain state.
- Click Constants.
- Select the balances pallet.
- Select existentialDeposit as the constant value as the value to query.
![Verify the constant value change]()


